
dify-mcp-client
MCP Client as an Agent Strategy Plugin. Support GUI operation via UI-TARS-SDK. Python-based implementation.
Documentation
dify-mcp-client
`MCP Client` as Agent Strategy Plugin with Computer Using Agent (UI-TARS-SDK) support.
> [!IMPORTANT]
> Dify is not `MCP Server` but `MCP Host`.
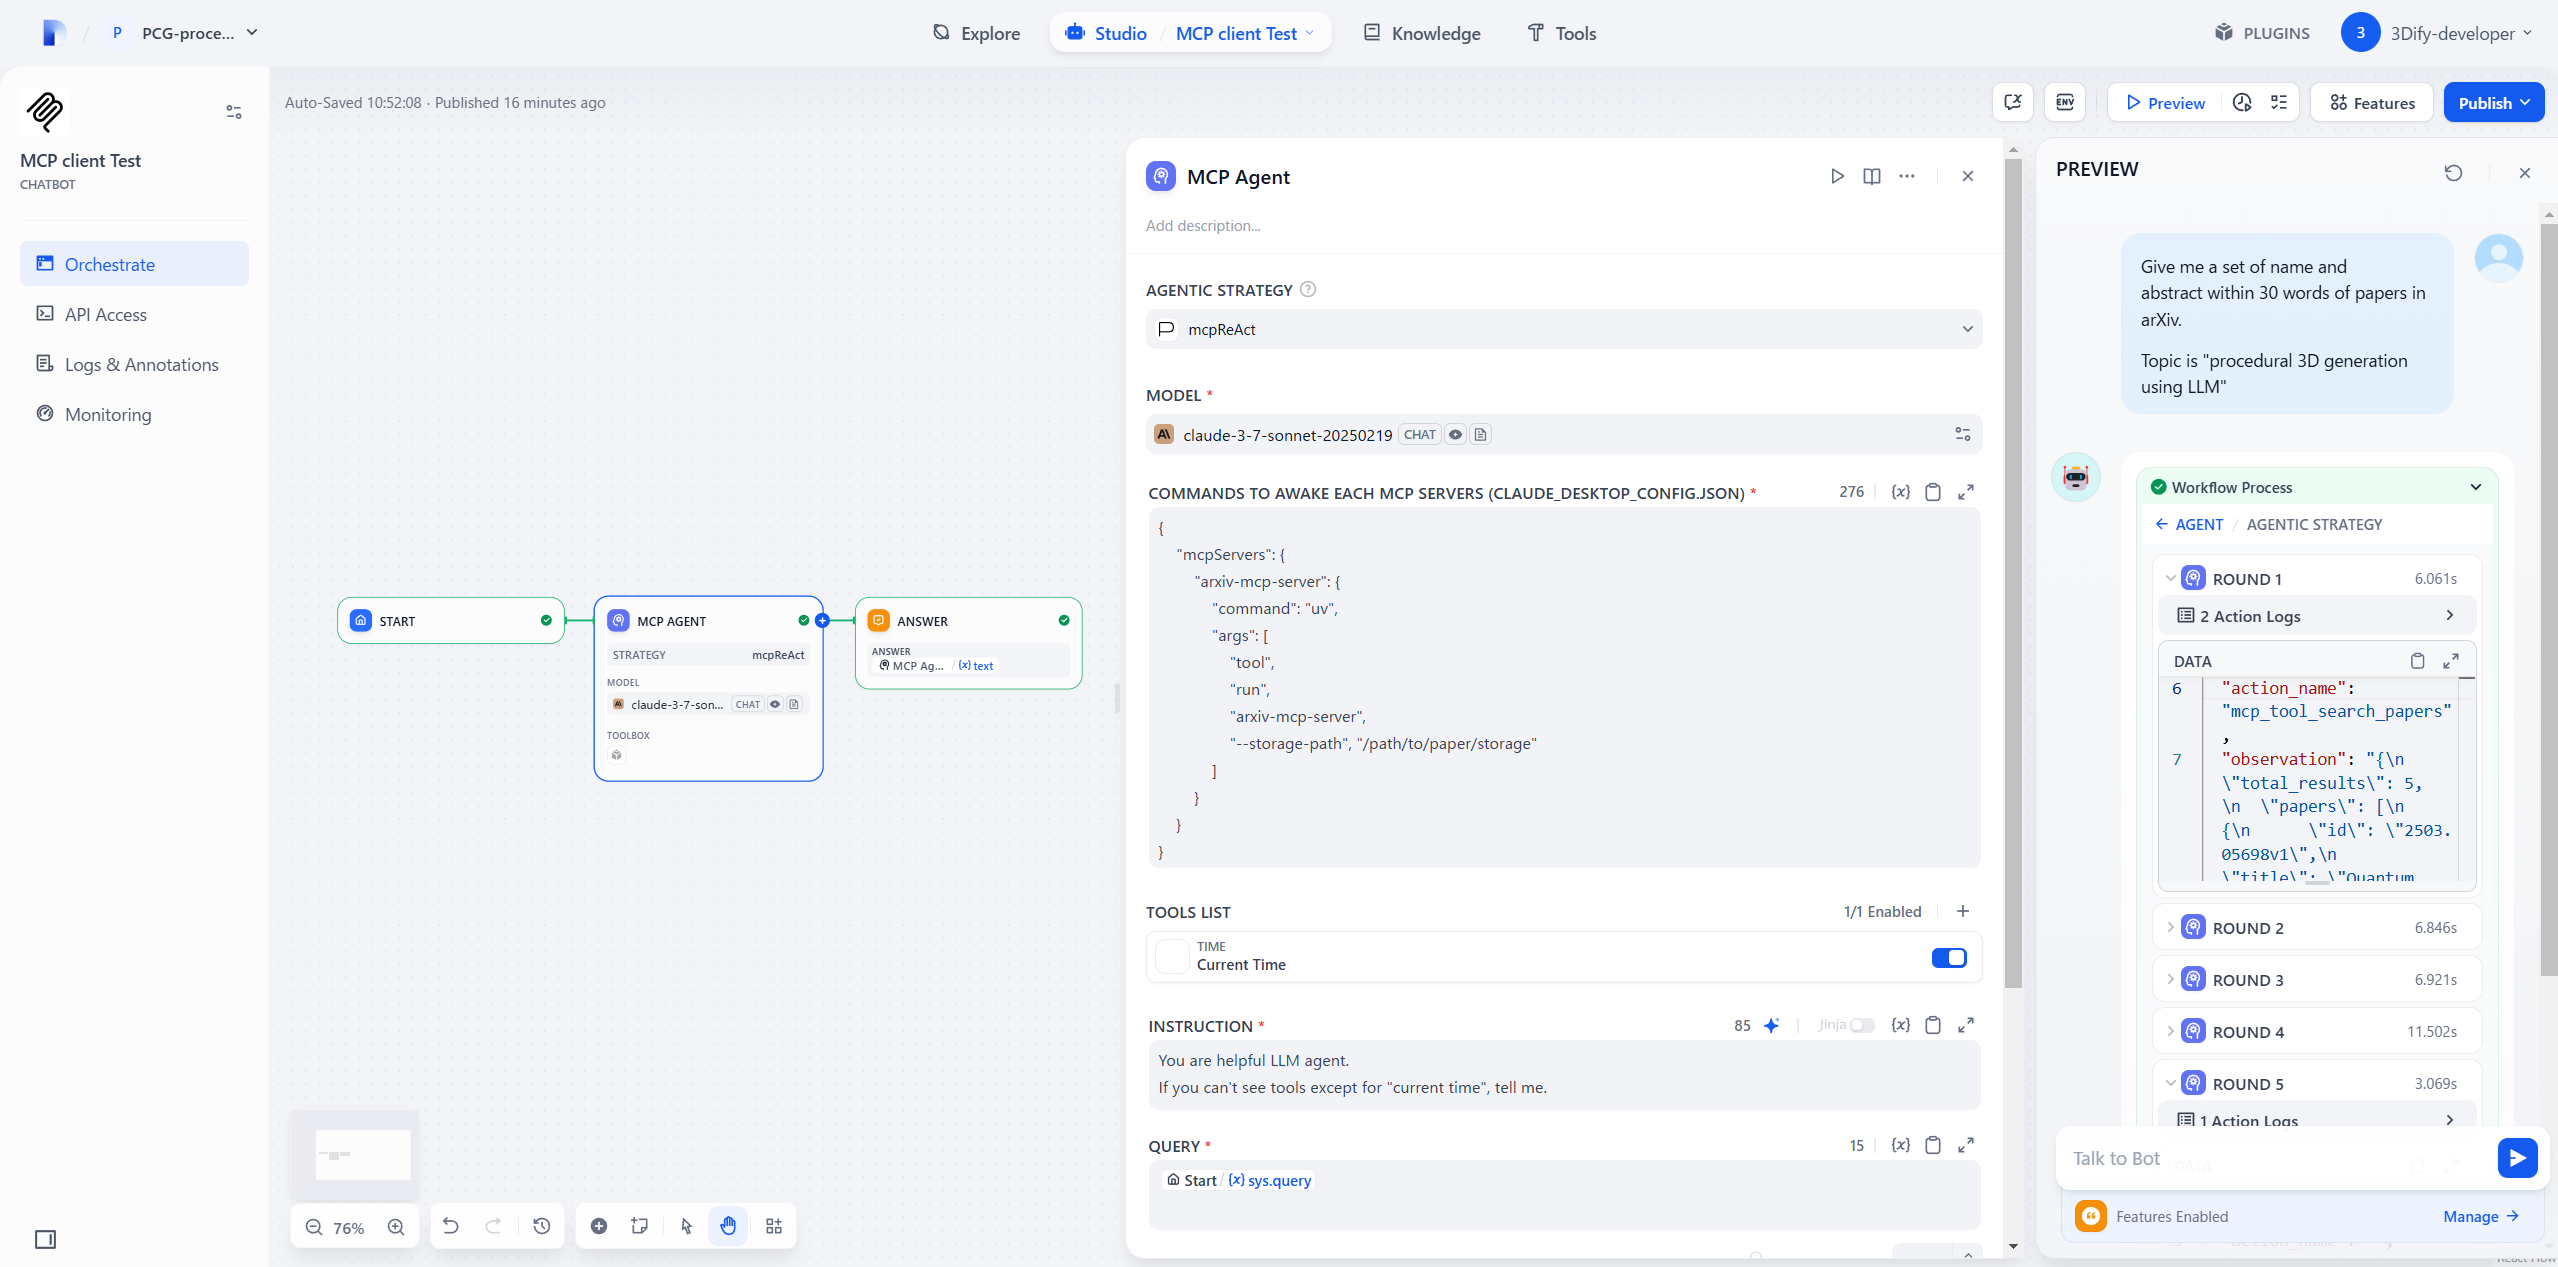
How it works
Each `MCP client` (ReAct Agent) node can connect `MCP servers`.
1. `Tool`, `Resource`, `Prompt` lists are converted into Dify Tools.
2. Your selected LLM can see their `name`, `description`, `argument type`
3. The LLM calls Tools based on the ReAct loop (Reason → Act → Observe).
> [!NOTE]
> Most of the code in this repository contains the following files.
> #### Dify Official Plugins / Agent Strategies
> https://github.com/langgenius/dify-official-plugins/tree/main/agent-strategies/cot_agent
✅ What I did
- Copied `ReAct.py` and renamed file as `mcpReAct.py`
- Added `config_json` GUI input field by editing `mcpReAct.yaml` and `class mcpReActParams()`
in mcpReAct.py, I added
- New 12 functions for MCP
- `__init__()` for initializing `AsyncExitStack` and `event loop`
- Some codes in `_handle_invoke_action()` for MCP
- MCP setup and cleanup in `_invoke()`
> [!IMPORTANT]
> ReAct while loop is as they are
🔄 Update history
- Add SSE MCP client (v0.0.2)
- Support multi SSE servers (v0.0.3)
- Update python module and simplify its dependency (v0.0.4)
- mcp(v1.1.2→v1.6.0+)
- dify_plugin(0.0.1b72→v0.1.0)
- Add UI-TARS SDK integration for GUI automation capabilities (v0.0.5)
- Support Streamable HTTP MCP client
- Feat SSE param: `/sse?key=value` (v0.0.6)
🤖 UI-TARS Integration
This plugin includes UI-TARS SDK integration for GUI automation capabilities.
> [!WARNING]
> UI-TARS-SDK integration is supported only Dify Plugin's local debug deployment.
> https://github.com/3dify-project/dify-mcp-client#-how-to-develop-and-deploy-plugin
>
> Normal difypkg install doesn't work. Because UI-TARS require OS native API, yet Dify plugin env is Linux docker container.
>
> I'm thinking alternative solusion via Streamable HTTP MCP.
Key Features
- On-demand GUI automation: UI-TARS is called only when needed, reducing token consumption
- Life-time control: Set maximum loop count per task to prevent runaway automation
Known Limitations
- Single Monitor Support: UI-TARS currently recognizes the primary monitor only. Multi-monitor setups are not supported.
- Mac Retina Display Issue: On macOS with Retina displays, UI-TARS requires the display resolution to be set to "Default" instead of the highest quality setting. Otherwise wrong (w,h) point is clicked. https://github.com/bytedance/UI-TARS-desktop/issues/591
Life-time Parameter
The `life_time` parameter controls the maximum number of GUI actions UI-TARS can perform:
- Default: 10 iterations
- User-configurable maximum via `ui_tars_max_life_time_count`
- Your selected LLM can dynamically adjust within the user-defined limit based on task complexity
> [!NOTE]
> Currently hardcoded to use UI-TARS-1.5-7B model for optimal cost-performance balance.
🐳 Docker Deployment with Pre-built Node.js
Building the Docker Image
This pulldown guide is for TypeScript stdio MCP server user
docker build -t dify-mcp-client:latest .Or use our pre-built image:
# In your docker-compose.yml
services:
  plugin-daemon:
    image: memedayo/dify-plugin-daemon:latest  # with Pre-built Node.js
    # ... rest of configuration
Without Node.js in container, you lose TypeScript stdio MCP support.
UI-TARS Configuration
For detailed UI-TARS setup, refer to the UI-TARS Desktop deployment guide.
The plugin automatically configures UI-TARS as a tool within the ReAct loop. You need to provide:
- Hugging Face Inference Endpoint URL
- API Key like (hf_xxxxx)
- (Optional) Adjust `ui_tars_max_life_time_count` in agent parameters
⚠️ Caution and Limitation
> [!CAUTION]
> This plugin does not implement a human-in-the-loop mechanism by default, so connect reliable mcp server only.
> To avoid it, decrease `max itereations`(default:`3`) to `1`, and use this Agent node repeatedly in Chatflow.
> However, agent memory is reset by the end of Workflow.
> Use `Conversaton Variable` to save history and pass it to QUERY.
> Don't forget to add a phrase such as
> *"ask for user's permission when calling tools"* in INSTRUCTION.
How to use this plugin
🛜Install the plugin from GitHub
- Enter the following GitHub repository name
https://github.com/3dify-project/dify-mcp-client/- Dify > PLUGINS > + Install plugin > INSTALL FROM > GitHub
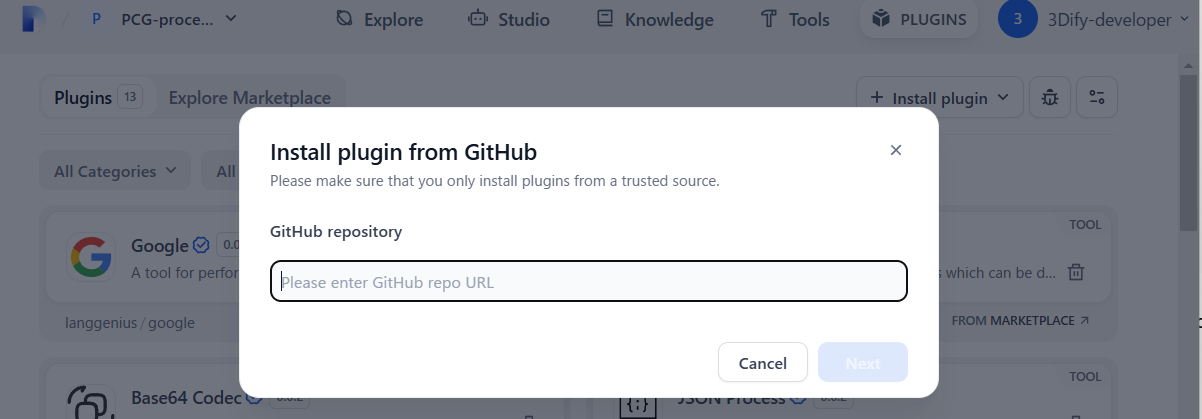
⬇️Install the plugin from .difypkg file
- Go to Releases https://github.com/3dify-project/dify-mcp-client/releases
- Select suitable version of `.difypkg`
- Dify > PLUGINS > + Install plugin > INSTALL FROM > Local Package File
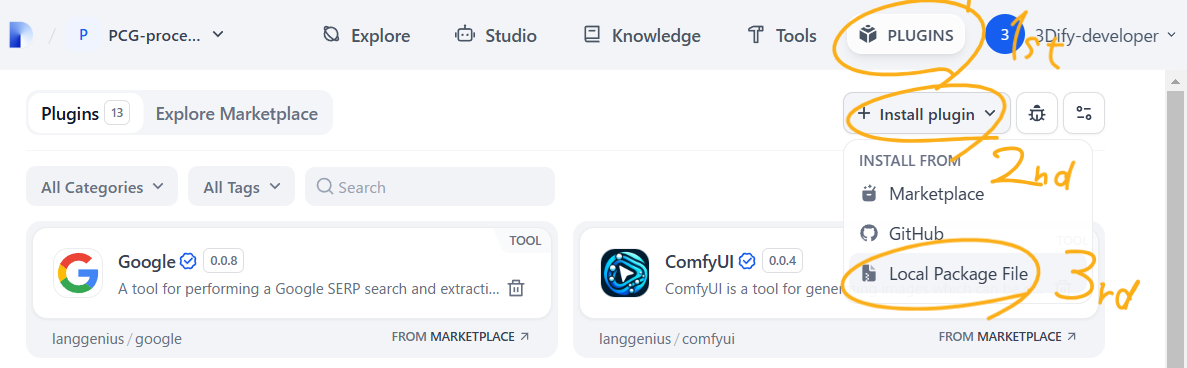
How to handle errors when installing plugins?
Issue: If you encounter the error message: `plugin verification has been enabled, and the plugin you want to install has a bad signature`, how to handle the issue?
Solution: Open `/docker/.env` and change from `true` to `false`:
FORCE_VERIFYING_SIGNATURE=falseRun the following commands to restart the Dify service:
cd docker
docker compose down
docker compose up -d
Once this field is added, the Dify platform will allow the installation of all plugins that are not listed (and thus not verified) in the Dify Marketplace.
Where does this plugin show up?
- It takes few minutes to install
- Once installed, you can use it any workflows as Agent node
- Select "mcpReAct" strategy (otherwise no MCP)
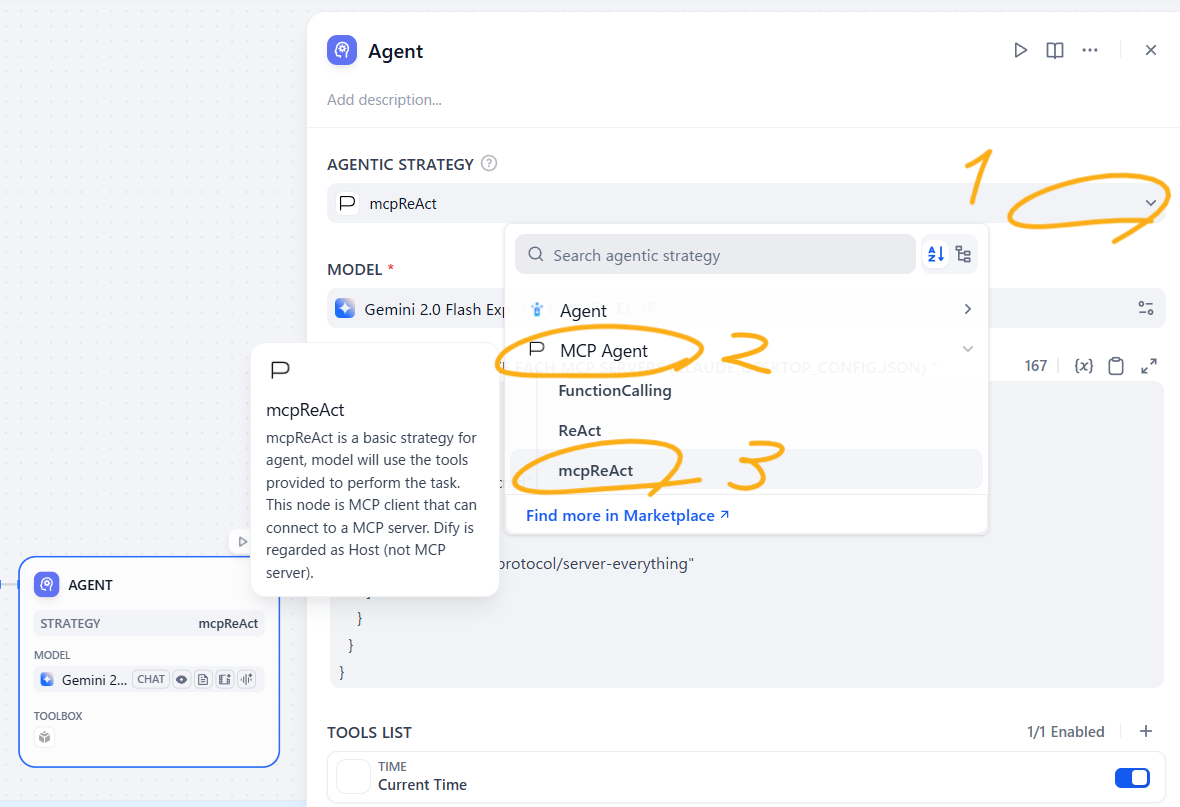
Config
MCP Agent Plugin node require config_json like this to command or URL to connect MCP servers
{
    "mcpServers":{
        "name_of_server1":{
            "url": "http://host.docker.internal:8080/sse"
        },
        "name_of_server2":{
            "url": "http://host.docker.internal:8008/mcp"
        }
    }
}
> [!WARNING]
> - Each server's port number should be different, like 8080, 8008, ...
> - If you want to use stdio mcp server, there are 3 ways.
> 1. Convert it to Streamable HTTP mcp server using mcp-proxy https://github.com/sparfenyuk/mcp-proxy?tab=readme-ov-file#1-stdio-to-ssestreamablehttp
> 2. Deploy with source code (NOT by .difypkg or GitHub reposity name install) https://github.com/3dify-project/dify-mcp-client/edit/main/README.md#-how-to-develop-and-deploy-plugin
> 3. Pre-install Node.js inside dify-plugin docker (Only TypeScript stdio server)
Chatflow Example
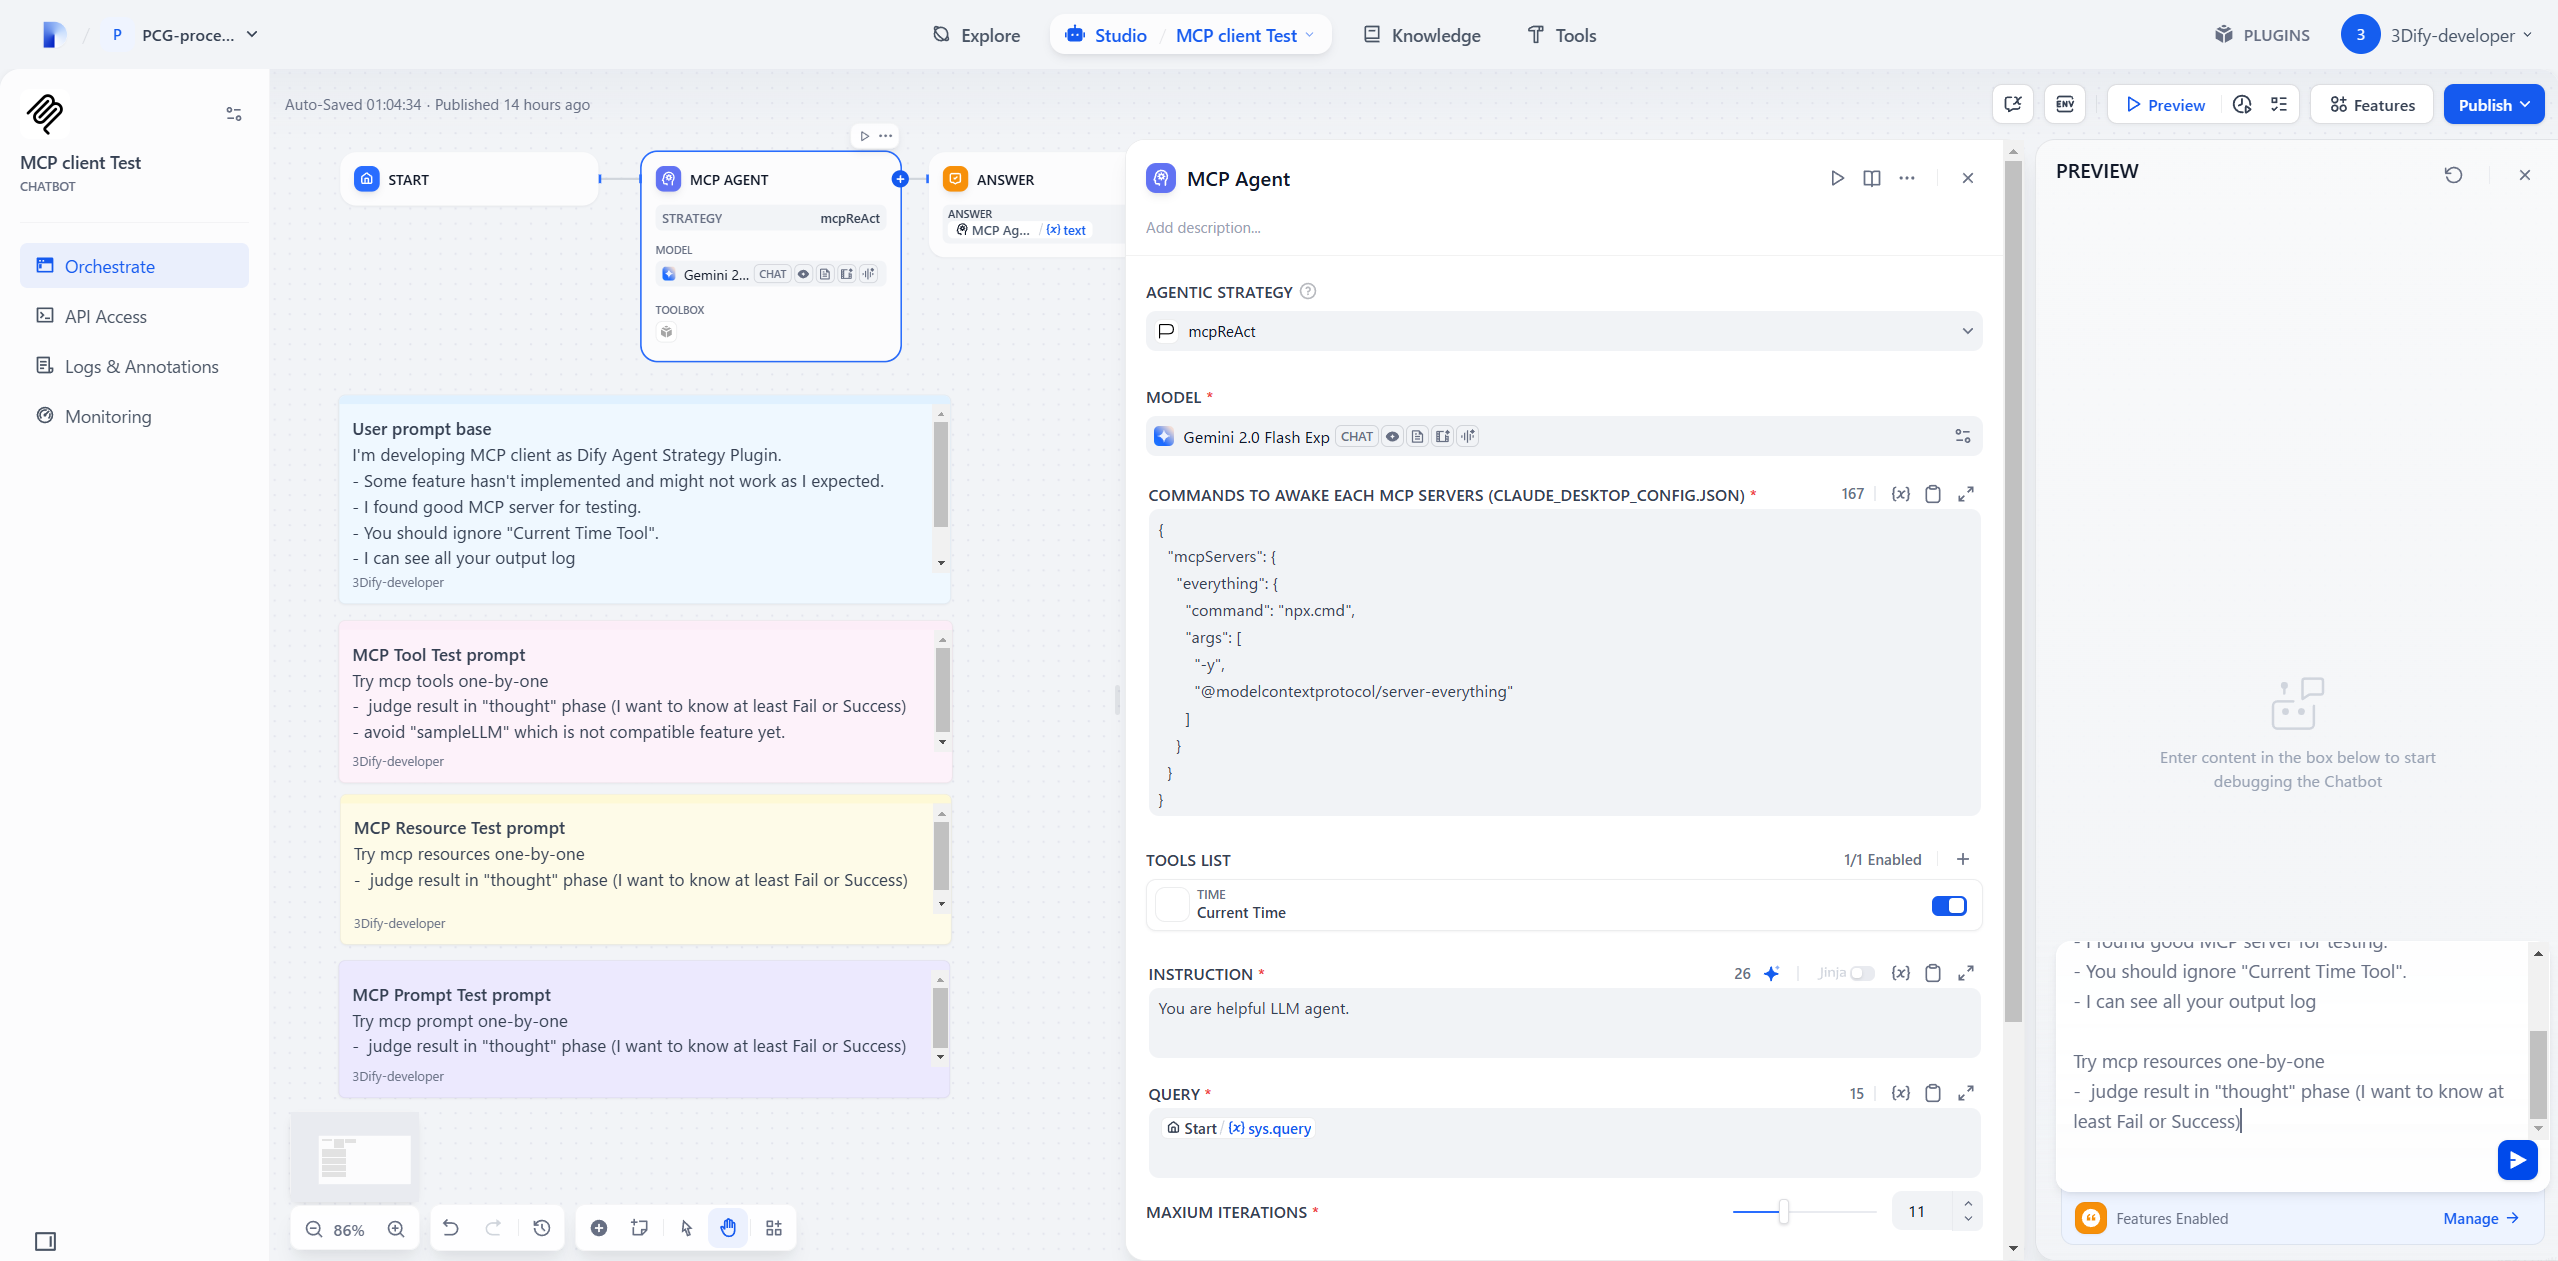
> [!WARNING]
> - The Tools field should not be left blank. so select Dify tools like "current time".
I provide this Dify ChatFlow `.yml` for testing this plugin.
https://github.com/3dify-project/dify-mcp-client/tree/main/test/chatflow
After download DSL(yml) file, import it in Dify and you can test MCP using "Everything MCP server"
https://github.com/modelcontextprotocol/servers/tree/main/src/everything
How to convert stdio MCP server into Stremable HTTP (or SSE)
option1️⃣: Edit MCP server's code
If fastMCP server, change like this
if __name__ == "__main__":
-    mcp.run(transport="stdio")
+    mcp.run(transport="streamable-http")
option2️⃣: via mcp-proxy
> [!WARNING]
> Streamable HTTP is recommended instead of deprecated SSE
> Following old SSE setup doesn't work. Read https://github.com/sparfenyuk/mcp-proxy instead.
SSE setup (NOT Streamable HTTP)
\mcp-proxy>uv venv -p 3.12
.venv\Scripts\activate
uv tool install mcp-proxy
Check Node.js has installed and npx(.cmd) Path
(Mac/Linux)
which npx(Windows)
where npxresult
C:\Program Files\nodejs\npx
C:\Program Files\nodejs\npx.cmd
C:\Users\USER_NAME\AppData\Roaming\npm\npx
C:\Users\USER_NAME\AppData\Roaming\npm\npx.cmd
If claude_desktop_config.json is following schema,
{
  "mcpServers": {
    "SERVER_NAME": {
       "command": CMD_NAME_OR_PATH
       "args": {VALUE1, VALUE2}
    }
  }
}
Wake up stdio MCP server by this command
mcp-proxy --sse-port=8080 --pass-environment -- CMD_NAME_OR_PATH --arg1 VALUE1 --arg2 VALUE2 ...If your OS is Windows, use npx.cmd instead of npx. Following is example command to convert stdio "everything MCP server" to SSE via mcp-proxy.
mcp-proxy --sse-port=8080 --pass-environment -- C:\Program Files\nodejs\npx.cmd --arg1 -y --arg2 @modelcontextprotocol/server-everythingSimilarly, on another command line (If you use sample Chatflow for v0.0.3)
pip install mcp-simple-arxiv
mcp-proxy --sse-port=8008 --pass-environment -- C:\Users\USER_NAME\AppData\Local\Programs\Python\Python310\python.exe -m -mcp_simple_arxiv
Following is a mcp-proxy setup log.
(mcp_proxy) C:\User\USER_NAME\mcp-proxy>mcp-proxy --sse-port=8080 --pass-environment -- C:\Program Files\nodejs\npx.cmd --arg1 -y --arg2 @modelcontextprotocol/server-everything
DEBUG:root:Starting stdio client and SSE server
DEBUG:asyncio:Using proactor: IocpProactor
DEBUG:mcp.server.lowlevel.server:Initializing server 'example-servers/everything'
DEBUG:mcp.server.sse:SseServerTransport initialized with endpoint: /messages/
INFO:     Started server process [53104]
INFO:     Waiting for application startup.
INFO:     Application startup complete.
INFO:     Uvicorn running on http://127.0.0.1:8080 (Press CTRL+C to quit)
🔨 How to develop and deploy plugin
Official plugin dev guide
https://github.com/3dify-project/dify-mcp-client/blob/main/GUIDE.md
Dify plugin SDK daemon
If your OS is Windows and CPU is Intel or AMD, you need to download the latest `dify-plugin-windows-amd64.exe`
Choose your OS-compatible verson here:
https://github.com/langgenius/dify-plugin-daemon/releases
1. Rename it as dify.exe for convinence
2. mkdir "C\User\user\\.local\bin" (Windows) and register it as system path.
3. Copy `dify.exe` to under dify-mcp-client/
> [!TIP]
> Following guide is helpful.
> https://docs.dify.ai/plugins/quick-start/develop-plugins/initialize-development-tools
Reference
https://docs.dify.ai/plugins/quick-start/develop-plugins/initialize-development-tools
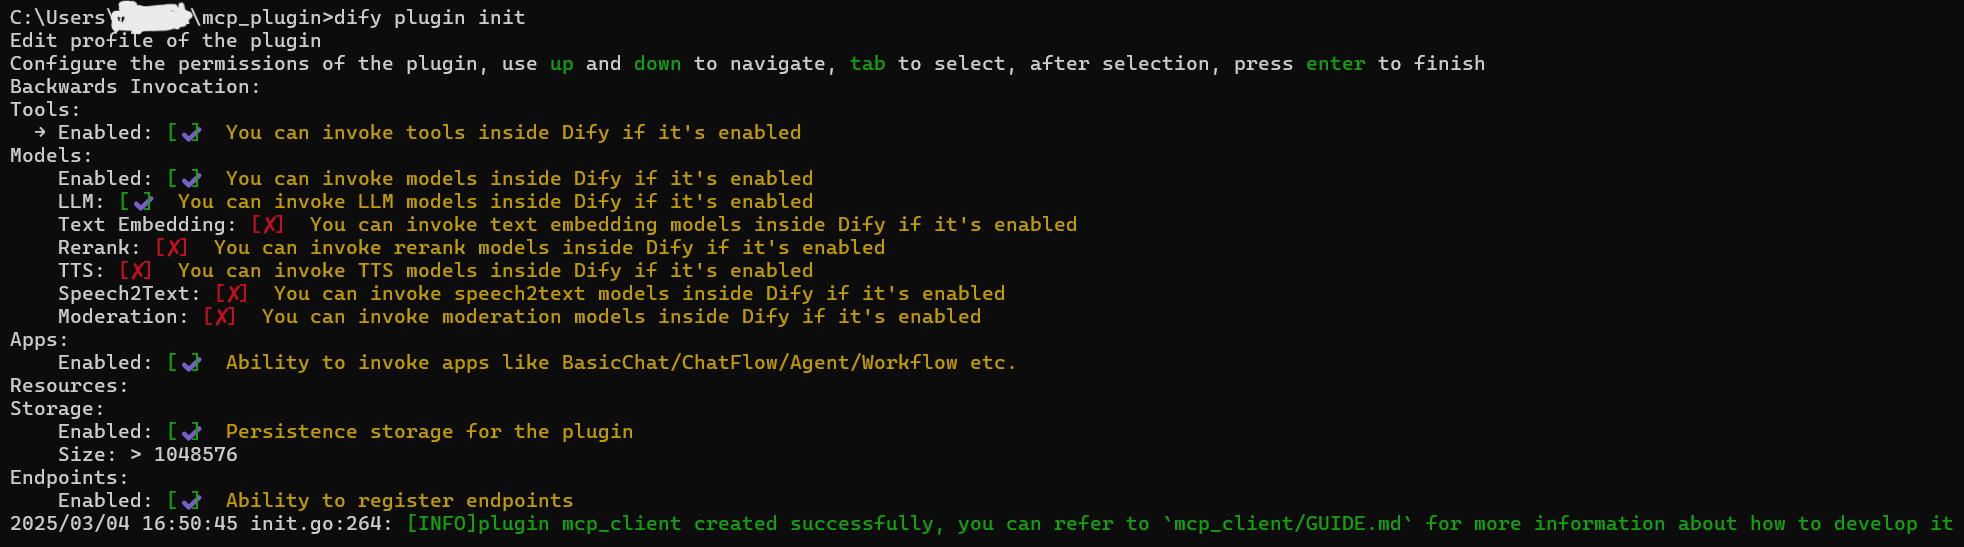
> [!NOTE]
> You can skip this stage if you pull or download codes of this repo
> ```
> dify plugin init
> ```
> Initial settings are as follow
Change directory
cd dify-mcp-clientInstall python module
Python3.12+ is compatible. The `venv` and `uv` are not necessary, but recommended.
uv venv -p 3.12
.venv\Scripts\activate
Install python modules for plugin development
uv pip install -r requirements.txtFor only UI-TARS-SDK user (after installing Node.js v22 LTS)
npm installDuplicate `env.example` and rename one to `.env`
I changed `REMOTE_INSTALL_HOST` from `debug.dify.ai` to `localhost`
(Docker Compose environment)
click 🪲bug icon button to see these information
Activate Dify plugin
python -m main(ctrl+C to stop)
> [!TIP]
> REMOTE_INSTALL_KEY of .env often changes.
> If you encounter error messages like `handshake failed, invalid key`, renew it.
Package into .difypkg
`./dify-mcp-client` is my default root name
dify plugin package ./ROOT_OF_YOUR_PROJECTUseful GitHub repositories for developers
Dify Plugin SDKs
https://github.com/langgenius/dify-plugin-sdks
MCP Python SDK
https://github.com/modelcontextprotocol/python-sdk
> [!TIP]
> MCP client example
> https://github.com/modelcontextprotocol/python-sdk/blob/main/examples/clients/simple-chatbot/mcp_simple_chatbot/main.py
> [!NOTE]
> Dify plugin has `requirements.txt` which automatically installs python modules.
> I include latest `mcp` in it, so you don't need to download the MCP SDK separately.
Frequently asked questions
What is dify-mcp-client?
dify-mcp-client is MCP Client as an Agent Strategy Plugin. Support GUI operation via UI-TARS-SDK. Python-based implementation.
How do I install dify-mcp-client?
Open the GitHub repository and follow its README. Most MCP servers are added to your client's MCP config, then called by your agent.
Is dify-mcp-client open source?
Yes — it is hosted on GitHub at https://github.com/3dify-project/dify-mcp-client and has 158 stars.
Related MCP tools
 mcp
mcpAWS MCP Servers — helping you get the most out of AWS, wherever you use MCP. Python-based implementation. Trusted by 6900+ developers.
 mcp-sse
A working pattern for SSE-based MCP clients and servers Python-based implementation.
 fastmcp
🚀 The fast, Pythonic way to build MCP servers and clients Trusted by 19900+ developers. Trusted by 19900+ developers. Trusted by 19900+ developers.
 mcpo
mcpoA simple, secure MCP-to-OpenAPI proxy server Python-based implementation. Trusted by 3500+ developers. Trusted by 3500+ developers.
 minimax-mcp
Official MiniMax Model Context Protocol (MCP) server that enables interaction with powerful Text to Speech, image generation and video generation APIs.
 mcpstore
开盒即用的优雅管理mcp服务 | 结合Agent框架 | 作者听劝 | 已发布pypi | Vue页面demo Python-based implementation.
Run your own MCP server? See who uses it and what to fix.
Measure it with TrackMCP