
cursor-proxmox-mcp
MCP to manage Proxmox VMs in Cursor
Documentation
cursor-proxmox-mcp - Proxmox MCP Server for Cursor with OpenAPI (optional)
Cursor focused Python-based Model Context Protocol (MCP) server for interacting with Proxmox virtualization platform with fixes and enhancements.
🆕 New Features and Improvements
All Tests Pass
- Previously tests would not complete so I fixed them up
Continued Support
- I need this to manage my own proxmox instances so I will continue to publish updates and changes as I see fit.
Major enhancements compared to the original version:
- ✨ Complete VM Lifecycle Management
- Brand new `create_vm` tool - Support for creating virtual machines with custom configurations
- New `delete_vm` tool - Safe VM deletion (with force deletion option)
- Enhanced intelligent storage type detection (LVM/file-based)
- 🔧 Extended Power Management Features
- `start_vm` - Start virtual machines
- `stop_vm` - Force stop virtual machines
- `shutdown_vm` - Graceful shutdown
- `reset_vm` - Restart virtual machines
- 🐳 New Container Support
- `get_containers` - List all LXC containers and their status
- 📊 Enhanced Monitoring and Display
- Improved storage pool status monitoring
- More detailed cluster health status checks
- Rich output formatting and themes
- 🌐 Complete OpenAPI Integration
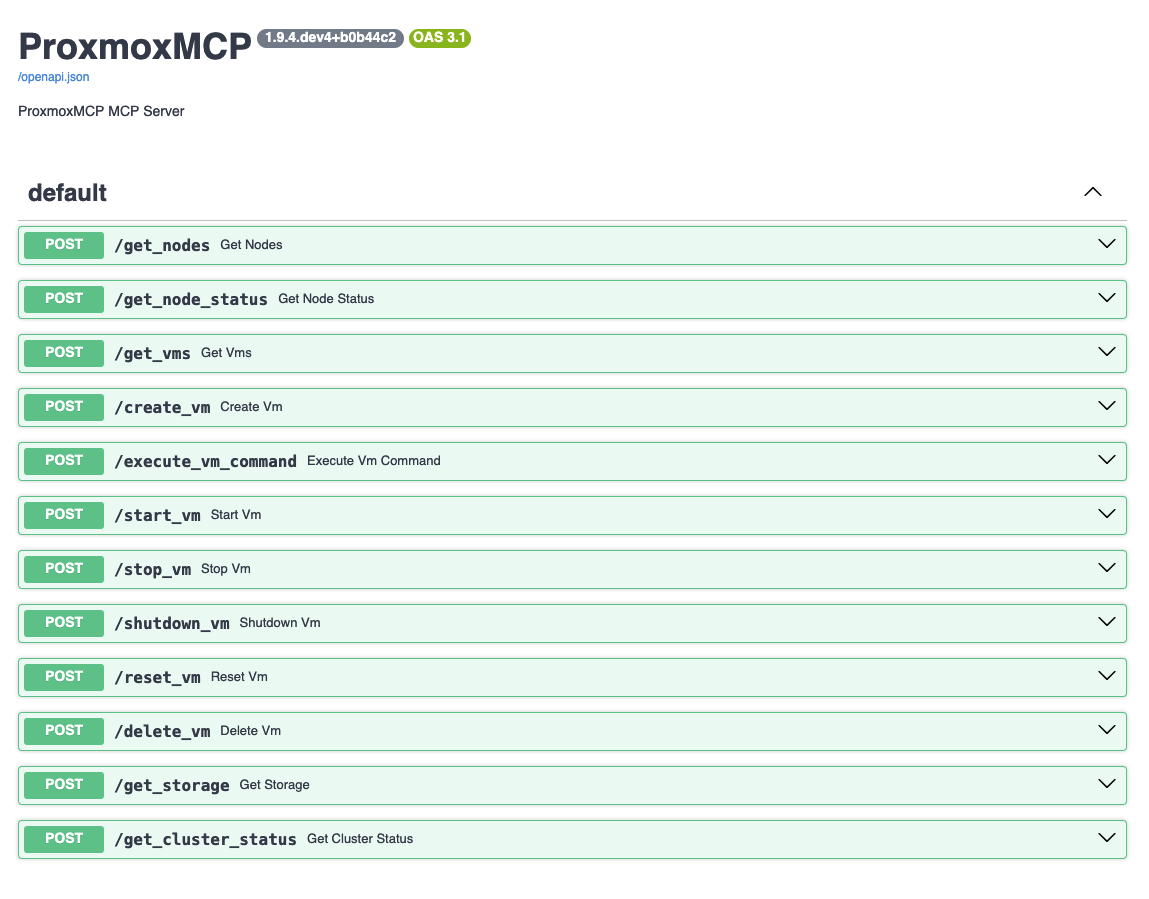
- 11 complete REST API endpoints
- Production-ready Docker deployment
- Perfect Open WebUI integration
- Natural language VM creation support
- 🛡️ Production-grade Security and Stability
- Enhanced error handling mechanisms
- Comprehensive parameter validation
- Production-level logging
- Complete unit test coverage
Built With
- Cursor
- Proxmoxer - Python wrapper for Proxmox API
- MCP SDK - Model Context Protocol SDK
- Pydantic - Data validation using Python type annotations
Features
- 🤖 Full integration with Cursor and Open WebUI
- 🛠️ Built with the official MCP SDK
- 🔒 Secure token-based authentication with Proxmox
- 🖥️ Complete VM lifecycle management (create, start, stop, reset, shutdown, delete)
- 💻 VM console command execution
- 🐳 LXC container management support
- 🗃️ Intelligent storage type detection (LVM/file-based)
- 📝 Configurable logging system
- ✅ Type-safe implementation with Pydantic
- 🎨 Rich output formatting with customizable themes
- 🌐 OpenAPI REST endpoints for integration
- 📡 11 fully functional API endpoints
Installation
Prerequisites
- UV package manager (recommended)
- Python 3.10 or higher
- Git
- Access to a Proxmox server with API token credentials
Before starting, ensure you have:
- [ ] Proxmox server hostname or IP
- [ ] Proxmox API token (see API Token Setup)
- [ ] UV installed (`pip install uv`)
Option 1: Quick Install (Recommended)
1. Clone and set up environment:
# Clone repository
   git clone https://github.com/agentify-sh/cursor-proxmox-mcp.git
   cd ProxmoxMCP-Plus

   # Create and activate virtual environment
   uv venv

   # or force 3.11 (for mcpo dependency)
   python3.11 -m venv .venv

   # then activate it
   source .venv/bin/activate  # Linux/macOS
   # OR
   .\.venv\Scripts\Activate.ps1  # Windows
2. Install dependencies:
# Install with development dependencies
   uv pip install -e ".[dev]"

   #or via pip
   pip install -e .
   pip install pytest pytest-asyncio black mypy ruff types-requests
   pip install mcpo #need python 3.11
3. Create configuration:
# Create config directory and copy template
   mkdir -p proxmox-config
   cp proxmox-config/config.example.json proxmox-config/config.json
4. Edit `proxmox-config/config.json`:
{
       "proxmox": {
           "host": "PROXMOX_HOST",        # Required: Your Proxmox server address
           "port": 8006,                  # Optional: Default is 8006
           "verify_ssl": false,           # Optional: Set false for self-signed certs
           "service": "PVE"               # Optional: Default is PVE
       },
       "auth": {
           "user": "USER@pve",            # Required: Your Proxmox username
           "token_name": "TOKEN_NAME",    # Required: API token ID
           "token_value": "TOKEN_VALUE"   # Required: API token value
       },
       "logging": {
           "level": "INFO",               # Optional: DEBUG for more detail
           "format": "%(asctime)s - %(name)s - %(levelname)s - %(message)s",
           "file": "proxmox_mcp.log"      # Optional: Log to file
       }
   }
Verifying Installation
1. Check Python environment:
python -c "import proxmox_mcp; print('Installation OK')"2. Run the tests:
pytest3. Verify configuration:
# Linux/macOS
   PROXMOX_MCP_CONFIG="proxmox-config/config.json" python -m proxmox_mcp.server

   # Windows (PowerShell)
   $env:PROXMOX_MCP_CONFIG="proxmox-config\config.json"; python -m proxmox_mcp.server
Configuration
Proxmox API Token Setup
1. Log into your Proxmox web interface
2. Navigate to Datacenter -> Permissions -> API Tokens
3. Create a new API token:
Running the Server
Development Mode
For testing and development:
# Activate virtual environment first
source .venv/bin/activate  # Linux/macOS
# OR
.\.venv\Scripts\Activate.ps1  # Windows

# Run the server
python -m proxmox_mcp.server
OpenAPI Deployment (Production Ready)
Deploy ProxmoxMCP Plus as standard OpenAPI REST endpoints for integration with Open WebUI and other applications.
Quick OpenAPI Start
# Install mcpo (MCP-to-OpenAPI proxy)
pip install mcpo

# Start OpenAPI service on port 8811
./start_openapi.sh
Docker Deployment
# Build and run with Docker
docker build -t proxmox-mcp-api .
docker run -d --name proxmox-mcp-api -p 8811:8811 \
  -v $(pwd)/proxmox-config:/app/proxmox-config proxmox-mcp-api

# Or use Docker Compose
docker-compose up -d
Access OpenAPI Service
Once deployed, access your service at:
- 📖 API Documentation: http://your-server:8811/docs
- 🔧 OpenAPI Specification: http://your-server:8811/openapi.json
- ❤️ Health Check: http://your-server:8811/health
Cline Desktop Integration
For Cline users, add this configuration to your MCP settings file (typically at `~/.config/Code/User/globalStorage/saoudrizwan.claude-dev/settings/cline_mcp_settings.json`):
{
    "mcpServers": {
        "ProxmoxMCP-Plus": {
            "command": "/absolute/path/to/ProxmoxMCP-Plus/.venv/bin/python",
            "args": ["-m", "proxmox_mcp.server"],
            "cwd": "/absolute/path/to/ProxmoxMCP-Plus",
            "env": {
                "PYTHONPATH": "/absolute/path/to/ProxmoxMCP-Plus/src",
                "PROXMOX_MCP_CONFIG": "/absolute/path/to/ProxmoxMCP-Plus/proxmox-config/config.json",
                "PROXMOX_HOST": "your-proxmox-host",
                "PROXMOX_USER": "username@pve",
                "PROXMOX_TOKEN_NAME": "token-name",
                "PROXMOX_TOKEN_VALUE": "token-value",
                "PROXMOX_PORT": "8006",
                "PROXMOX_VERIFY_SSL": "false",
                "PROXMOX_SERVICE": "PVE",
                "LOG_LEVEL": "DEBUG"
            },
            "disabled": false,
            "autoApprove": []
        }
    }
}
Available Tools & API Endpoints
The server provides 11 comprehensive MCP tools and corresponding REST API endpoints:
VM Management Tools
create_vm
Create a new virtual machine with specified resources.
Parameters:
- `node` (string, required): Name of the node
- `vmid` (string, required): ID for the new VM
- `name` (string, required): Name for the VM
- `cpus` (integer, required): Number of CPU cores (1-32)
- `memory` (integer, required): Memory in MB (512-131072)
- `disk_size` (integer, required): Disk size in GB (5-1000)
- `storage` (string, optional): Storage pool name
- `ostype` (string, optional): OS type (default: l26)
API Endpoint:
POST /create_vm
Content-Type: application/json

{
    "node": "pve",
    "vmid": "200",
    "name": "my-vm",
    "cpus": 1,
    "memory": 2048,
    "disk_size": 10
}
Example Response:
🎉 VM 200 created successfully!

📋 VM Configuration:
  • Name: my-vm
  • Node: pve
  • VM ID: 200
  • CPU Cores: 1
  • Memory: 2048 MB (2.0 GB)
  • Disk: 10 GB (local-lvm, raw format)
  • Storage Type: lvmthin
  • Network: virtio (bridge=vmbr0)
  • QEMU Agent: Enabled

🔧 Task ID: UPID:pve:001AB729:0442E853:682FF380:qmcreate:200:root@pam!mcp
VM Power Management 🆕
start_vm: Start a virtual machine
POST /start_vm
{"node": "pve", "vmid": "200"}stop_vm: Force stop a virtual machine
POST /stop_vm
{"node": "pve", "vmid": "200"}shutdown_vm: Gracefully shutdown a virtual machine
POST /shutdown_vm
{"node": "pve", "vmid": "200"}reset_vm: Reset (restart) a virtual machine
POST /reset_vm
{"node": "pve", "vmid": "200"}
delete_vm 🆕: Completely delete a virtual machine
POST /delete_vm
{"node": "pve", "vmid": "200", "force": false}
🆕 Container Management Tools
get_containers 🆕
List all LXC containers across the cluster.
API Endpoint: `POST /get_containers`
Example Response:
🐳 Containers

🐳 nginx-server (ID: 200)
  • Status: RUNNING
  • Node: pve
  • CPU Cores: 2
  • Memory: 1.5 GB / 2.0 GB (75.0%)
Monitoring Tools
get_nodes
Lists all nodes in the Proxmox cluster.
API Endpoint: `POST /get_nodes`
Example Response:
🖥️ Proxmox Nodes

🖥️ pve-compute-01
  • Status: ONLINE
  • Uptime: ⏳ 156d 12h
  • CPU Cores: 64
  • Memory: 186.5 GB / 512.0 GB (36.4%)
get_node_status
Get detailed status of a specific node.
Parameters:
- `node` (string, required): Name of the node
API Endpoint: `POST /get_node_status`
get_vms
List all VMs across the cluster.
API Endpoint: `POST /get_vms`
get_storage
List available storage pools.
API Endpoint: `POST /get_storage`
get_cluster_status
Get overall cluster status and health.
API Endpoint: `POST /get_cluster_status`
execute_vm_command
Execute a command in a VM's console using QEMU Guest Agent.
Parameters:
- `node` (string, required): Name of the node where VM is running
- `vmid` (string, required): ID of the VM
- `command` (string, required): Command to execute
API Endpoint: `POST /execute_vm_command`
Requirements:
- VM must be running
- QEMU Guest Agent must be installed and running in the VM
Open WebUI Integration
Configure Open WebUI
1. Access your Open WebUI instance
2. Navigate to Settings → Connections → OpenAPI
3. Add new API configuration:
{
  "name": "Proxmox MCP API Plus",
  "base_url": "http://your-server:8811",
  "api_key": "",
  "description": "Enhanced Proxmox Virtualization Management API"
}
Natural Language VM Creation
Users can now request VMs using natural language:
- "Can you create a VM with 1 cpu core and 2 GB ram with 10GB of storage disk"
- "Create a new VM for testing with minimal resources"
- "I need a development server with 4 cores and 8GB RAM"
The AI assistant will automatically call the appropriate APIs and provide detailed feedback.
Storage Type Support
Intelligent Storage Detection
ProxmoxMCP Plus automatically detects storage types and selects appropriate disk formats:
LVM Storage (local-lvm, vm-storage)
- ✅ Format: `raw`
- ✅ High performance
- ⚠️ No cloud-init image support
File-based Storage (local, NFS, CIFS)
- ✅ Format: `qcow2`
- ✅ Cloud-init support
- ✅ Flexible snapshot capabilities
Project Structure
ProxmoxMCP-Plus/
├── 📁 src/                          # Source code
│   └── proxmox_mcp/
│       ├── server.py                # Main MCP server implementation
│       ├── config/                  # Configuration handling
│       ├── core/                    # Core functionality
│       ├── formatting/              # Output formatting and themes
│       ├── tools/                   # Tool implementations
│       │   ├── vm.py               # VM management (create/power) 🆕
│       │   ├── container.py        # Container management 🆕
│       │   └── console/            # VM console operations
│       └── utils/                   # Utilities (auth, logging)
│
├── 📁 tests/                       # Unit test suite
├── 📁 test_scripts/                # Integration tests & demos
│   ├── README.md                   # Test documentation
│   ├── test_vm_power.py           # VM power management tests 🆕
│   ├── test_vm_start.py           # VM startup tests
│   ├── test_create_vm.py          # VM creation tests 🆕
│   └── test_openapi.py            # OpenAPI service tests
│
├── 📁 proxmox-config/              # Configuration files
│   └── config.json                # Server configuration
│
├── 📄 Configuration Files
│   ├── pyproject.toml             # Project metadata
│   ├── docker-compose.yml         # Docker orchestration
│   ├── Dockerfile                 # Docker image definition
│   └── requirements.in            # Dependencies
│
├── 📄 Scripts
│   ├── start_server.sh            # MCP server launcher
│   └── start_openapi.sh           # OpenAPI service launcher
│
└── 📄 Documentation
    ├── README.md                  # This file
    ├── VM_CREATION_GUIDE.md       # VM creation guide
    ├── OPENAPI_DEPLOYMENT.md      # OpenAPI deployment
    └── LICENSE                    # MIT License
Testing
Run Unit Tests
pytestRun Integration Tests
cd test_scripts

# Test VM power management
python test_vm_power.py

# Test VM creation
python test_create_vm.py

# Test OpenAPI service
python test_openapi.py
API Testing with curl
# Test node listing
curl -X POST "http://your-server:8811/get_nodes" \
  -H "Content-Type: application/json" \
  -d "{}"

# Test VM creation
curl -X POST "http://your-server:8811/create_vm" \
  -H "Content-Type: application/json" \
  -d '{
    "node": "pve",
    "vmid": "300",
    "name": "test-vm",
    "cpus": 1,
    "memory": 2048,
    "disk_size": 10
  }'
Production Security
API Key Authentication
Set up secure API access:
export PROXMOX_API_KEY="your-secure-api-key"
export PROXMOX_MCP_CONFIG="/app/proxmox-config/config.json"
Nginx Reverse Proxy
Example nginx configuration:
server {
    listen 80;
    server_name your-domain.com;

    location / {
        proxy_pass http://localhost:8811;
        proxy_set_header Host $host;
        proxy_set_header X-Real-IP $remote_addr;
    }
}
Troubleshooting
Common Issues
1. Port already in use
netstat -tlnp | grep 8811
   # Change port if needed
   mcpo --port 8812 -- ./start_server.sh
2. Configuration errors
# Verify config file
   cat proxmox-config/config.json
3. Connection issues
# Test Proxmox connectivity
   curl -k https://your-proxmox:8006/api2/json/version
View Logs
# View service logs
tail -f proxmox_mcp.log

# Docker logs
docker logs proxmox-mcp-api -f
Deployment Status
✅ Feature Completion: 100%
- [x] VM Creation (user requirement: 1 CPU + 2GB RAM + 10GB storage) 🆕
- [x] VM Power Management (start VPN-Server ID:101) 🆕
- [x] VM Deletion Feature 🆕
- [x] Container Management (LXC) 🆕
- [x] Storage Compatibility (LVM/file-based)
- [x] OpenAPI Integration (port 8811)
- [x] Open WebUI Integration
- [x] Error Handling & Validation
- [x] Complete Documentation & Testing
Production Ready!
ProxmoxMCP Plus is now fully ready for production use!
When users say "Can you create a VM with 1 cpu core and 2 GB ram with 10GB of storage disk", the AI assistant can:
1. 📞 Call the `create_vm` API
2. 🔧 Automatically select appropriate storage and format
3. 🎯 Create VMs that match requirements
4. 📊 Return detailed configuration information
5. 💡 Provide next-step recommendations
Development
After activating your virtual environment:
- Run tests: `pytest`
- Format code: `black .`
- Type checking: `mypy .`
- Lint: `ruff .`
License
MIT License
Acknowledgments
This project is built upon the excellent open-source project ProxmoxMCP by @RekklesNA. Thanks to the original author for providing the foundational framework and creative inspiration! I will continue to update it specifically for usage with Cursor IDE.
Special Thanks
- Thanks to @RekklesNA for the enhancements
- Thanks to @canvrno for the excellent foundational project ProxmoxMCP
- Thanks to the Proxmox community for providing the powerful virtualization platform
- Thanks to all contributors and users for their support
Ready to Deploy! 🎉 Your enhanced Proxmox MCP service with OpenAPI integration is ready for production use.
Frequently asked questions
What is cursor-proxmox-mcp?
cursor-proxmox-mcp is MCP to manage Proxmox VMs in Cursor
How do I install cursor-proxmox-mcp?
Open the GitHub repository and follow its README. Most MCP servers are added to your client's MCP config, then called by your agent.
Is cursor-proxmox-mcp open source?
Yes — it is hosted on GitHub at https://github.com/agentify-sh/cursor-proxmox-mcp and has 9 stars.
Related MCP tools
 openhands
🙌 OpenHands: Code Less, Make More for the Model Context Protocol. Enhance AI assistants with powerful integrations. Python-based implementation.
 mem0
mem0Universal memory layer for AI Agents; Announcing OpenMemory MCP - local and secure memory management. Python-based implementation.
 chatgpt-on-wechat
基于大模型搭建的聊天机器人,同时支持 微信公众号、企业微信应用、飞书、钉钉 等接入,可选择ChatGPT/Claude/DeepSeek/文心一言/讯飞星火/通义千问/ Gemini/GLM-4/Kimi/LinkAI,能处理文本、语音和图片,访问操作系统和互联网,支持基于自有知识库进行定制企业智能客服。
 gpt-researcher
An LLM agent that conducts deep research (local and web) on any given topic and generates a long report with citations. Built for the Model Context Protocol to
 fastmcp
🚀 The fast, Pythonic way to build MCP servers and clients Trusted by 19900+ developers. Trusted by 19900+ developers. Trusted by 19900+ developers.
 maxkb
maxkb🔥 MaxKB is an open-source platform for building enterprise-grade agents. MaxKB 是强大易用的开源企业级智能体平台。 for the Model Context Protocol. Enhance AI assistants with po
Run your own MCP server? See who uses it and what to fix.
Measure it with TrackMCP